What if there were some easy hacks to make knitting from charts easier, faster and more enjoyable? It's not too good to be true - there are plenty of simple tricks you can use when working from charts. I use each of these tips myself (sometimes all at the time!) and I'm sure that one, some or all will work for you, too.
Hack #1: Blow It Up!
For years, I would struggle through a tiny chart with tiny symbols that made my eyes crossed. Then one day, I realized that I could just MAKE IT BIGGER. Whoa. Mind blown.
Back in the day, this meant a trip to the local copy shop, but now that I have a printer/scanner at home, it is really easy to enlarge charts as needed. Plus, it is a lot easier to adjust the way a PDF will print out, so you can also enlarge the page containing the chart in question, subject to the capabilities of your printer and level of techno-savvy, of course.
Hack #2: Color Inside the Lines....and Out Of Them.
The pattern you are working from doesn't need to be a pristine document worthy of the Smithsonian - so don't be afraid to write on it. Here are some things that I will do to a chart to make it easier to read:
Hack #4: Accessorize
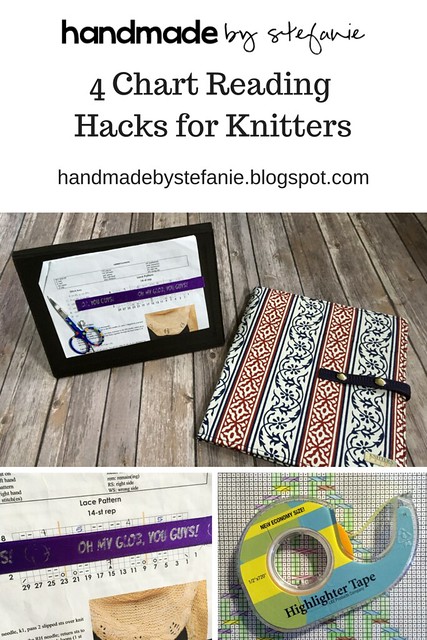
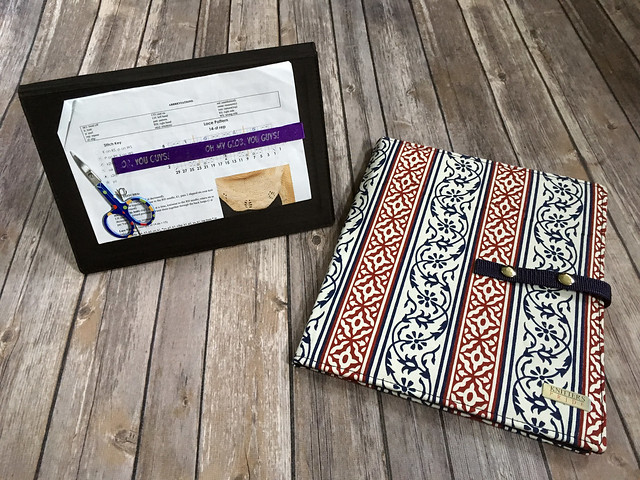
Chart Keeper. I'm sure there are a lot of versions of this type of product, but the ones I have been using for years are by Knitter's Pride and are similar to a notebook that you can stash your pattern in. One of the surfaces is magnetic, allowing you to secure your pattern with smaller magnets, and then keep track of where you are with a long magnetic strip. It can also be propped up on a nearby table for easy reference while you work!
I actually don't use the magnetic strip that came with each of my pattern holders because I have some Adventure Time-themed strips I bought a long time ago from Slipped Stitch Studios. They were designed to clip around a sheep of paper, but I found that the darn things never stayed put, so I cut them in half to be used on the magnetic board of my chart keeper.
Another cool thing you can do is stick things like small scissors, darning needles, and even stitch markers to the super-strong magnet that is holding your pattern in place. As you can imagine, that can be quite handy!
Hack #1: Blow It Up!
For years, I would struggle through a tiny chart with tiny symbols that made my eyes crossed. Then one day, I realized that I could just MAKE IT BIGGER. Whoa. Mind blown.
Back in the day, this meant a trip to the local copy shop, but now that I have a printer/scanner at home, it is really easy to enlarge charts as needed. Plus, it is a lot easier to adjust the way a PDF will print out, so you can also enlarge the page containing the chart in question, subject to the capabilities of your printer and level of techno-savvy, of course.
 |
| A color-coded cabled chart and highlighter tape! |
The pattern you are working from doesn't need to be a pristine document worthy of the Smithsonian - so don't be afraid to write on it. Here are some things that I will do to a chart to make it easier to read:
- Number the rows. Honestly, I don't know why any chart wouldn't have numbered rows, but it's been known to happen.
- Draw "reminder" arrows. Most of the projects I make are knit in the round, so when I am working a charted pattern flat, it is very easy to forget that wrong side rows are worked left to right (instead of right to left). So, I will draw a tiny arrow on the left hand side of EACH wrong side row to give me a visual reminder to START THERE!
- Color coding is your friend. If there are a lot of symbols to keep track of - particularly, a lot of cables - color coding is your friend. Grab markers, highlighters, or colored pencils, and start by filling in the chart key to assign your colors. Then, carefully go through the chart to fill in each symbol with the corresponding color. As you work more and more repeats of the chart, you should be able to move faster because your mind will remember which color belongs to which stitch, eliminating the need to keep referring back to the key!
Hack #3: Sometimes, you gotta chart the chart.
Unfortunately, not every designer uses the standards created by the Craft Yarn Council, and the result can sometimes be a Very Weird Chart Symbol. You have probably encountered one or two in a pattern: they often appear as strange squiggles that probably indicate a stitch that you are familiar with, but it's just so darn inscrutable and forgettable that it trips you up EVERY TIME.
Perhaps the pattern you working from is full of them - that can be a real headache!
This is when having some sort of charting software at your disposal can be really handy, because you can just create your own version of the chart using symbols that you can actually understand and remember. The only downside is that it will take a bit of time and cost some money, since most free versions of charting software are either limited in their scope or for the length of time you can use them - but I assure you, it will be worth it in the end, because you will finish your project faster, with minimal hair-pulling.
For the price, I really like Intwined Pattern Studio. I have used it for many years and found it reasonably easy to both learn and use.
I recently purchased Stitch Mastery based on countless recommendations from designers I work with, but I am having a really tough time making friends with it. I am not certain I can wholeheartedly recommend it thus far (but that is probably another topic for another day), and every time I try to use it, I find myself wishing I had tried the free version first before jumping in with both feet.
I have never tried Chart Minder, but I'm probably going to test it out soon because it's free and it does so much more than just knitting patterns - you can also chart crochet and cross stitch patterns!
 |
| Knitter's Pride Chart Keepers. |
There are a few gadgets that are worth investing in to make working from a chart easier:
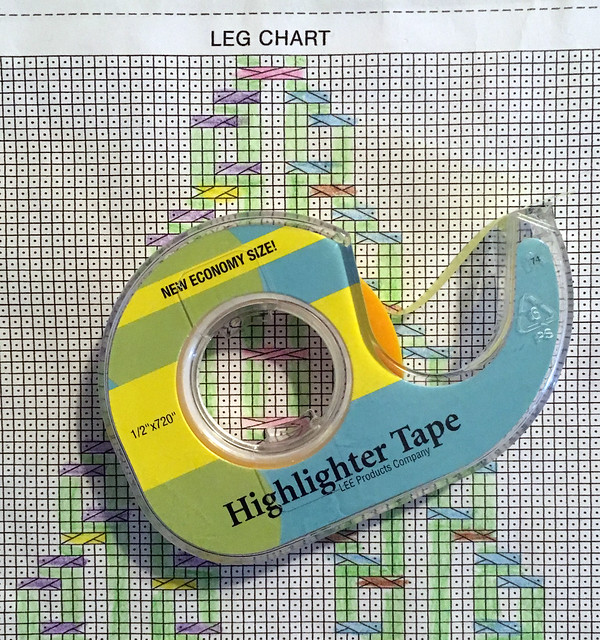
Highlighter tape. It's affordable and easy to use - one roll is around $3 and each one I've bought has lasted for a couple of years. The draw of this product is that it is reposition-able, which means that you can reuse the same strip as long as it remains sticky. I find that placing your chart in a plastic sleeve will keep the ink from transferring to the highlighter tape, which not only makes it look gross, but also causes it to lose stickiness faster.
Chart Keeper. I'm sure there are a lot of versions of this type of product, but the ones I have been using for years are by Knitter's Pride and are similar to a notebook that you can stash your pattern in. One of the surfaces is magnetic, allowing you to secure your pattern with smaller magnets, and then keep track of where you are with a long magnetic strip. It can also be propped up on a nearby table for easy reference while you work!
I actually don't use the magnetic strip that came with each of my pattern holders because I have some Adventure Time-themed strips I bought a long time ago from Slipped Stitch Studios. They were designed to clip around a sheep of paper, but I found that the darn things never stayed put, so I cut them in half to be used on the magnetic board of my chart keeper.
Another cool thing you can do is stick things like small scissors, darning needles, and even stitch markers to the super-strong magnet that is holding your pattern in place. As you can imagine, that can be quite handy!
Row Counter. Honestly, I am not opposed to just making tic marks to keep track of where I am in any given pattern. But I know that a lot of people swear by a row counter, and I have found them to be useful in certain situations. The Sirka Row Counter, in particular, is really useful if you are trying to follow several sets of instructions concurrently.
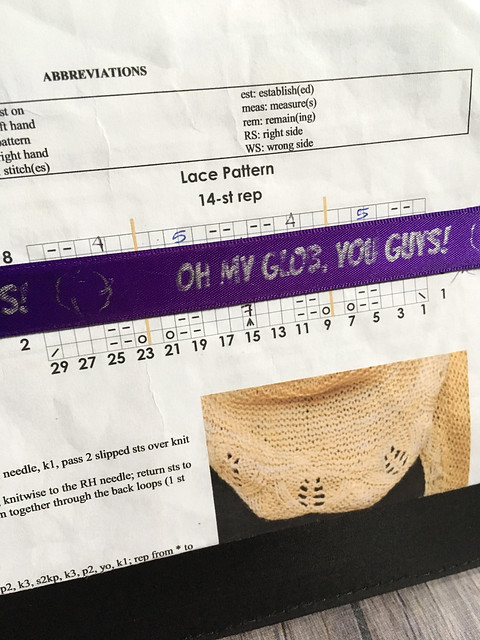 |
| Oh my glob! Magnetic stripes from Slipped Stitch Studios, in use on my Knitter's Pride chart keeper. |
Do you have your own tips and tricks for speedy chart reading that you don't see here? I'd love to hear about them in the comments!
Like this post? Pin it!
Great ideas, thank you! I've been teaching myself lace knitting and I do have some weirdly coded charts that take time to get into.
ReplyDeleteDid you really mean to say 'a sheep of paper' under Hack #4 Chart Keeper?? Love it!
Beth